Welcome to our article on the ever-popular game, Minecraft! Today, we’re going to guide you through the process of making a water bottle, a simple yet crucial item in the game. Whether you’re a beginner or an experienced player, we promise you’ll find this information handy and easy to follow.
Creating a water bottle in Minecraft might seem like a minor detail, but it’s an essential step for brewing potions, which can grant you some significant advantages in your gameplay. So, let’s dive right in!
Before we get started, be sure to gather the necessary materials. You’ll need:
- Glass: You’ll need three pieces of glass to craft a glass bottle.
- Water Source: This can be any body of water in the Minecraft world.
With these materials in hand, you’re ready to begin the process of crafting a water bottle. In the following sections, we’ll walk you through each step, ensuring that you understand every detail. So, let’s get started on your Minecraft adventure!
Introduction: Why Do You Need Water Bottles in Minecraft?
Imagine this: You’re deep in a Minecraft cave system. You’ve been mining for hours, and your health and hunger bars are starting to dwindle. Now, wouldn’t it be fantastic if you had a water bottle to quench your virtual thirst and continue your adventure? This is precisely where water bottles come into play in the colossal world of Minecraft.
Water bottles are a crucial component when it comes to brewing potions. Potions, in turn, are essential for enhancing your abilities and fighting off monsters. Whether you’re looking to craft a Potion of Healing, a Potion of Fire Resistance, or even a Potion of Invisibility, your journey begins with a humble water bottle.
Take note: a water bottle in itself may not have direct effects on the player. But when used as a base for brewing potions, it turns into an indispensable tool in your Minecraft universe.
Survival and Adventure
Survival and adventure in Minecraft often go hand in hand. From exploring vast terrains to battling fierce creatures, a water bottle is your first step towards survival. This item becomes all the more critical when participating in Hardcore mode or Survival mode, where maintaining your wellbeing is paramount.
The Element of Fun
Minecraft is not just about survival; it’s also about having fun! And what’s more fun than brewing your potions? Experimenting with different potion recipes adds a layer of complexity and enjoyment to the game. All these experiments start with one simple ingredient: a water bottle.
So, whether you’re a Minecraft novice or a seasoned player, understanding how to make a water bottle is an essential skill you’ll need on your square-blocked adventures!
The Materials You Need to Collect for Crafting Water Bottles
Before you can craft a water bottle in Minecraft, you’ll need to gather the necessary materials. Gathering these materials may take some time and effort, but it’s all part of the fun and challenge of the game. Here’s what you’ll need:
- Glass: You’ll need three pieces of glass to create one water bottle. Glass is created by smelting sand in a furnace. So, you’ll need to have sand and a furnace at your disposal.
- Crafting Table: This is where you’ll put all your materials together to create your water bottle. If you don’t already have a crafting table, you can create one using four wooden planks.
- Water source: Once you’ve crafted your empty bottle, you’ll need a water source to fill it. Any body of water will do—be it a lake, river, or a simple bucket of water.
It’s important to note that while these materials are essential for crafting a water bottle, having additional tools and resources can make your crafting process smoother and more efficient. For instance, a pickaxe can be used to gather sand more quickly, and torches can provide light if you’re crafting at night.
Remember, Minecraft is all about exploration and creativity. If you don’t have these materials on hand, don’t worry. There’s always a way to find what you need in the world of Minecraft. The journey is half the fun!
Now that you have all your materials, it’s time to move on to the crafting process. But, we’ll get to that a little later. For now, focus on gathering these materials and getting ready for the next step.
How to Find or Craft a Brewing Stand in Minecraft
Before we delve into the process of making a water bottle in Minecraft, it’s crucial to understand the importance of a Brewing Stand and how to craft or find it. A Brewing Stand, to put it simply, is an essential ingredient to your potion-brewing process.
Now, let’s get down to the nitty-gritty of how to craft this crucial piece of equipment. Crafting a Brewing Stand is relatively straightforward. Here’s what you need:
- 3 Cobblestones: You can find these anywhere in your Minecraft world by mining stone blocks.
- 1 Blaze Rod: Blaze Rods are a bit trickier to come by as they’re found in the Nether, dropped by Blazes.
Once you’ve gathered these materials, follow these steps:
- Open your crafting table to bring up the 3×3 crafting grid.
- Place the Blaze Rod in the center square of the top row.
- Place the three Cobblestones in all squares of the bottom row.
- Drag the resulting Brewing Stand to your inventory.
However, if you don’t fancy crafting your own Brewing Stand, it’s also possible to find pre-existing ones in certain parts of the Minecraft world. These are typically located within Villages, specifically within a Cleric’s house. So, if you’re lucky enough to stumble upon a village, be sure to keep an eye out for these handy items!
Note: While Brewing Stands can be used for multiple brewing processes, for this guide, we’re solely focusing on their use for creating a water bottle.
The Brewing Process: Step-by-Step Guide to Making Water Bottles
As you delve deeper into the vast universe of Minecraft, brewing potions becomes an essential skill. It all starts with something as simple as a water bottle. Let’s break down the process into easy-to-follow steps.
Materials Needed
Before we start, make sure you have all the necessary materials handy:
- 3 Glass Blocks: To create the essential component of the water bottle – the glass bottle.
- 1 Crafting Table: If you don’t have one yet, you can create it by arranging four wooden planks in a 2×2 crafting grid.
- 1 Water Source: This could be a water block, a cauldron filled with water, or a water bucket.
Step 1: Crafting the Glass Bottle
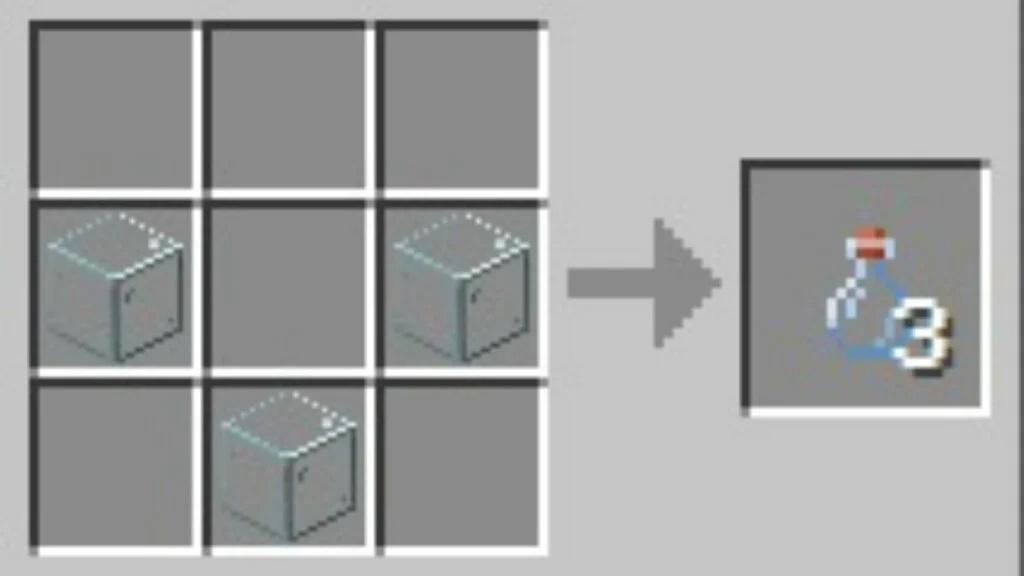
Start by creating the glass bottle. Open your crafting table, and place the three glass blocks in the crafting grid in a V shape – one block in the middle of the first row, and one block each in the first and third column of the second row. This will yield you three glass bottles.
Step 2: Filling the Glass Bottle with Water
Next, you need to fill the glass bottle with water. Approach your chosen water source with the glass bottle in your hand and right-click to fill it. Voila! You have successfully made a water bottle in Minecraft.
Note: You can fill your glass bottles directly from any water source block, including rivers, oceans, or a single block of water you’ve placed specifically for brewing. However, using a cauldron can be a more controlled way to fill your bottles, especially if you’re brewing in a confined space.
Understanding the basics of brewing in Minecraft, such as making a water bottle, paves the way for creating an array of useful potions. Remember, practice makes perfect, so don’t hesitate to experiment with different brewing techniques to become a master alchemist in your Minecraft world.
How to Use Water Bottles in Minecraft: Tips and Tricks
Water bottles in Minecraft are handy items to have in your inventory. They are essential for brewing potions, a crucial aspect of gameplay that enhances your abilities and helps you survive in various situations. However, how do you get the most out of them? Here are some tips and tricks on how to use water bottles in Minecraft effectively.
Preparation
Before using a water bottle, you need to make one. This process is quite simple. Just three glass blocks in a crafting table will do the trick, arranged in a “V” shape. Once you’ve got your empty bottle, find a water source to fill it up. Water sources are plentiful, so you’ll rarely be without.
Utilizing Water Bottles
Now that you have your water bottle, what can you do with it? Here’s a quick rundown:
- Brewing Potions: A water bottle is the base ingredient for every potion in the game. Combine it with different ingredients in a brewing stand to create a variety of useful potions.
- Quenching Thirst: If you’re playing in hard mode or on a server with thirst mechanics, you can drink a water bottle to replenish your thirst bar.
- Extinguishing Fire: While not as effective as a bucket of water, throwing a water bottle can help put out fires in a pinch.
Storing Water Bottles
Water bottles stack in your inventory up to 3 items. It’s a good idea to keep a small stash of filled water bottles in a chest at your base. This way, you’re ready to brew potions at any time. Remember, preparation is key in the world of Minecraft!
Additional Tips
Don’t underestimate the importance of water bottles in Minecraft. They might seem like simple, easy-to-craft items, but their potential uses are vast. Always have a few on hand and ready to be used. You never know when they’ll come in handy!
Water bottles in Minecraft may seem simple, but they’re an important part of the game. By understanding their uses and making the most of them, you can enhance your gameplay and pave your way to becoming a Minecraft master!
Advanced Minecraft Brewing: Potions You Can Make with Water Bottles
As you delve deeper into the intricate world of Minecraft, you’ll discover that brewing and potion-making become essential skills. Water bottles are your basic ingredient for brewing potions. With a simple water bottle, you can whip up a diverse array of beneficial concoctions. Let’s dive into some of the potions you can create with water bottles.
Potion of Healing
The Potion of Healing is a handy potion that restores your health. To brew this, you will first need to make an Awkward Potion using a water bottle. Add a Glistering Melon to complete the potion.
Potion of Fire Resistance
Ever got burnt in lava or fire? The Potion of Fire Resistance is your safeguard. Start with a water bottle, brew an Awkward Potion, and then add a Magma Cream to the mix.
Potion of Strength
For those tough battles, the Potion of Strength is a must. It boosts your attack damage. Begin with an Awkward Potion made from a water bottle and then add a Blaze Powder to finish the brew.
Potion of Leaping
Want to jump higher? The Potion of Leaping is your answer. Starting with a water bottle, make an Awkward Potion, and add a Rabbit’s Foot to get your final product.
These are just a few of the many potions you can brew with water bottles in Minecraft. Each potion has its unique benefits, and mastering them can significantly enhance your game experience. Remember, practice makes perfect. So, start brewing!
How to Store Water Bottles in Minecraft: Inventory Management Tips
So, you’ve successfully made some water bottles in Minecraft, and now you’re wondering how best to store and manage them in your inventory? Not to worry, fellow explorer! We’ve got some handy tips to help you keep things tidy and accessible. Let’s dive in!
Stack Your Water Bottles
Firstly, it’s important to note that water bottles, unlike many other items in Minecraft, do not stack in your inventory. Each water bottle occupies its own slot. Therefore, it’s essential that you manage your inventory space wisely to accommodate this. If you’re planning on brewing a lot of potions, you might need to free up some space!
Use Chests for Storage
One effective way to manage your inventory is to use chests. Here’s how:
- Make a Chest: If you don’t already have one, you can make a chest using eight wooden planks in the crafting table. Place the planks in every slot except the center one.
- Place the Chest: Find a suitable location in your base and right-click to place the chest.
- Store the Water Bottles: Right-click on the chest to open it. You can then drag your water bottles into the chest for safekeeping.
Use Shulker Boxes for Portable Storage
If you need a more portable storage solution, consider using Shulker Boxes. You can place your water bottles into a Shulker Box, and then place that box into your inventory. This allows you to carry more items without overstuffing your inventory. However, remember that Shulker Boxes aren’t the easiest item to acquire, so use them wisely!
Tip: Using an Ender Chest can be a great way to access your stored items, including water bottles, from anywhere!
Inventory management is key in Minecraft, especially when dealing with non-stackable items like water bottles. With these tips, you should have no problem keeping track of your potion ingredients, no matter how many adventures you embark on!
Conclusion: Mastering the Art of Making Water Bottles in Minecraft
There you have it, the foolproof method to craft your very own water bottle in Minecraft. Remember, mastering this skill isn’t just about quenching your virtual thirst. It’s a stepping stone to crafting many other useful items, including potions that can boost your abilities and enhance gameplay.
Let’s quickly recap the steps:
- Gather the materials: You’ll need three pieces of glass. You can obtain glass by smelting sand in a furnace.
- Craft the glass bottle: Arrange the glass pieces in the shape of a “V” on your crafting table. This will yield three empty glass bottles.
- Fill the bottle: Simply click on a water source with an empty bottle in your hand and voila, you have a water bottle!
Remember, practice makes perfect. The more you engage with the game, the more familiar these steps will become. Soon, crafting water bottles will be second nature to you.
“Minecraft isn’t just a game. It’s an art form, complete with its own set of tools and techniques. Mastering these will open up a whole new world of possibilities.”
In conclusion, learning how to make a water bottle in Minecraft might seem like a small feat, but the knowledge and skills you gain through this process are invaluable. These basics will serve as a foundation for crafting more complex items and navigating the vast Minecraft universe with more confidence and ease. So, keep experimenting, keep learning, and most importantly, keep enjoying the game!