Hey there, crafty friend! Have you ever thought about creating something practical, eco-friendly, and stylish all at once? Well, we’ve got the perfect project for you – a Macrame Water Bottle Holder. With this nifty accessory, you can keep your water bottle handy and give plastic ones a miss, while flaunting your macrame-making prowess. So, are you ready to dive into the world of knots and patterns? Let’s get started!
In this comprehensive guide, we will walk you through the steps to create your very own macrame water bottle holder. But before we get our hands entwined in cord, let’s cover some basics.
- What is Macrame?: Macrame is a centuries-old art form that uses knotting techniques to create textiles. It’s seen a resurgence in popularity recently, and it’s not hard to see why. With just a few basic knots, you can create beautiful and functional items.
- What will I need?: You’ll need some cord, a pair of scissors, a ring for the holder, and your water bottle for size reference. And, of course, a pinch of patience and a dollop of creativity!
- Is it difficult?: Macrame might seem intimidating at first, but rest assured, it’s easier than it looks. And with our step-by-step guide, you’ll be knotting like a pro in no time.
So, why wait? Let’s embark on this macrame adventure together, shall we?
Introduction: What is a Macrame Water Bottle Holder?
and wished you had a stylish, hands-free way to carry your water bottle? Enter the macrame water bottle holder. This nifty accessory not only frees up your hands but also adds a boho-chic flair to your outfit. But what exactly is a macrame water bottle holder, you ask?
A macrame water bottle holder is a beautifully handcrafted piece made using the art of knotting cord or string in patterns to make decorative articles. The intricate designs can vary, making each holder a unique piece of functional art. With its roots in 13th-century Arabian weavers’ handiwork, macrame has seen a resurgence in popularity in recent years, and it’s easy to see why. The end product is not only practical but also aesthetically pleasing.
Key Features of a Macrame Water Bottle Holder
- Durability: Macrame water bottle holders are typically made with high-quality cotton, jute, or hemp cords, making them strong and long-lasting.
- Versatility: They can hold a range of water bottle sizes. Whether you have a small, medium, or large bottle, there’s a macrame holder for you.
- Stylish: Available in a variety of designs and colors, they can easily match your aesthetic or mood.
- Easy to Clean: Most are easy to clean, either by hand or in a washing machine, making them perfect for everyday use.
So, whether you’re an avid hiker, a busy mom on the go, or someone who appreciates functional art, a macrame water bottle holder could be the perfect addition to your life. Ready to craft your own? Keep reading to delve into our complete tutorial!
Materials Needed: A Complete List
my creative friend, ready to dive into the world of macrame? Before we get started, it’s essential to gather all the necessary materials. Trust me, you don’t want to be halfway through your project and realize you’re missing something crucial. It’s like baking a cake and forgetting the eggs – it just won’t work out! So, let’s ensure that you have everything you need to make your macrame water bottle holder.
Macrame Cord
First and foremost, you’ll need macrame cord. It’s the heart and soul of your project. But how much? For this project, 60-70 meters of 4-5 mm thickness cord should suffice. These measurements will create a sturdy, reliable holder without becoming too bulky. And don’t forget, you can choose any color you like – make it reflect your personality!
Scissors
Next on the list, a good pair of scissors. Not your regular kitchen scissors, but something sharp and strong enough to cut through the macrame cord. Dull scissors will leave you with frayed ends, and nobody wants that!
A Water Bottle
Perhaps it seems obvious, but you’ll need a water bottle. The size and shape of your bottle will dictate the design of your holder. So choose wisely, keeping in mind the practicality of carrying it around.
Measuring Tape
Measure twice, cut once, right? A measuring tape is essential to ensure accuracy in your project. Remember, every knot, every loop counts. And the beauty of macrame is in the precision of its design.
A Ring
Last but not least, you’ll need a ring. Often overlooked, a metallic or wooden ring serves as the anchor point for your holder. It’s where all your cords will come together, creating the top of your holder.
So, are you ready to get knotting? Have a quick check again – macrame cord, scissors, your water bottle, measuring tape, and a ring. Everything in place? Great! Let’s transform these simple materials into a functional and stylish macrmae water bottle holder.
Step 1: Measuring and Cutting the Cords
Now that you’re ready to embark on this exciting journey, let’s start with the first and foremost step – measuring and cutting the cords. Nothing says “crafty” quite like handling ropes and delivering precise cuts. Ready? Here we go!
Materials You’ll Need:
- A ruler or measuring tape
- Macrame cords
- Scissors
Hold on to your craft hats, folks, and let’s get into the nitty-gritty of how to measure and cut the cords for your macrame water bottle holder with precision and ease.
Measuring Your Cords
First things first, you’ll want to measure out your cords. But how long should they be? A great question! For a standard water bottle holder, you’ll need eight cords, each about 6 feet long. So, take your ruler or measuring tape and measure out your cords. Don’t forget to give yourself a little extra length for knots and fringes!
Cutting Your Cords
Next up, it’s chopping time. No, not veggies – your macrame cords! Once you’ve measured out your cords, use your scissors to cut them. Snip, snip! And voila, you’re done with the cutting. Easy peasy, lemon squeezy, right?
Remember, precision is key here, so take your time. Rome wasn’t built in a day, and your macrame water bottle holder won’t be either. Craftsmanship is all about patience and paying attention to the details. After all, we’re not just making something, we’re creating art.
Tip: Always cut your cords a bit longer than your measurements. This allows for any mistakes or adjustments you may need to make later. As grandma used to say, “Better safe than sorry!”
Alright, that wasn’t so scary, was it? Give yourself a pat on the back. You’ve completed the first step in creating your very own macrame water bottle holder. So, what are you waiting for? Let’s get knotting!
Step 2: Creating the Base Knots
get knotty? Great! Let’s dive into the wonderfully intricate world of base knots. This step is all about mastering the fundamental macrame knots you need to create your water bottle holder. Are you questioning what’s the big rush about these knots? Well, these are what give your macrame water bottle holder its structure, strength, and style!
Types of Base Knots
There are three primary knots you’ll be using for this project:
- Square Knot: The backbone of macrame, the square knot is both sturdy and decorative.
- Half Hitch Knot: This one is all about creating texture and curves in your design.
- Overhand Knot: Simple and quick, the overhand knot is used to secure your work.
Mastering the Square Knot
Let’s start with the square knot. A beginner favorite, it’s as easy as crossing two cords over and then under each other. Here’s a quick breakdown:
- Take your left cord and cross it over the center cords and under the right cord.
- Now, bring the right cord under the center cords and through the loop created by the left cord.
- Pull both ends to tighten. That’s the first half of your square knot.
- Repeat the process, but this time, start with the right cord.
- Once you’ve repeated step 2 with the right cord, pull to tighten, and there you have it—a complete square knot!
Getting to Grips with the Half Hitch Knot
Next up, let’s tackle the half hitch knot. This knot is about creating beautiful spirals. Follow these steps:
- Take your left cord and pass it over the right cord to form a loop.
- Bring the left cord under the right one and through the loop.
- Pull the left cord to tighten the knot—you just made a half hitch knot!
Conquering the Overhand Knot
Finally, we have the overhand knot. This one’s a cinch. Simply make a loop with your cord and pass the end through it. Pull tight and voila, you’ve created an overhand knot!
Pro tip: Practice these knots several times until you feel confident. Your fluency with these knots is what will make your macrame water bottle holder strong and beautiful.
With your newfound knot-tying skills, you’re ready to proceed to the next step. Remember, patience and practice make for perfect knots. So, get those hands working and let’s move on to weaving the body of your water bottle holder!
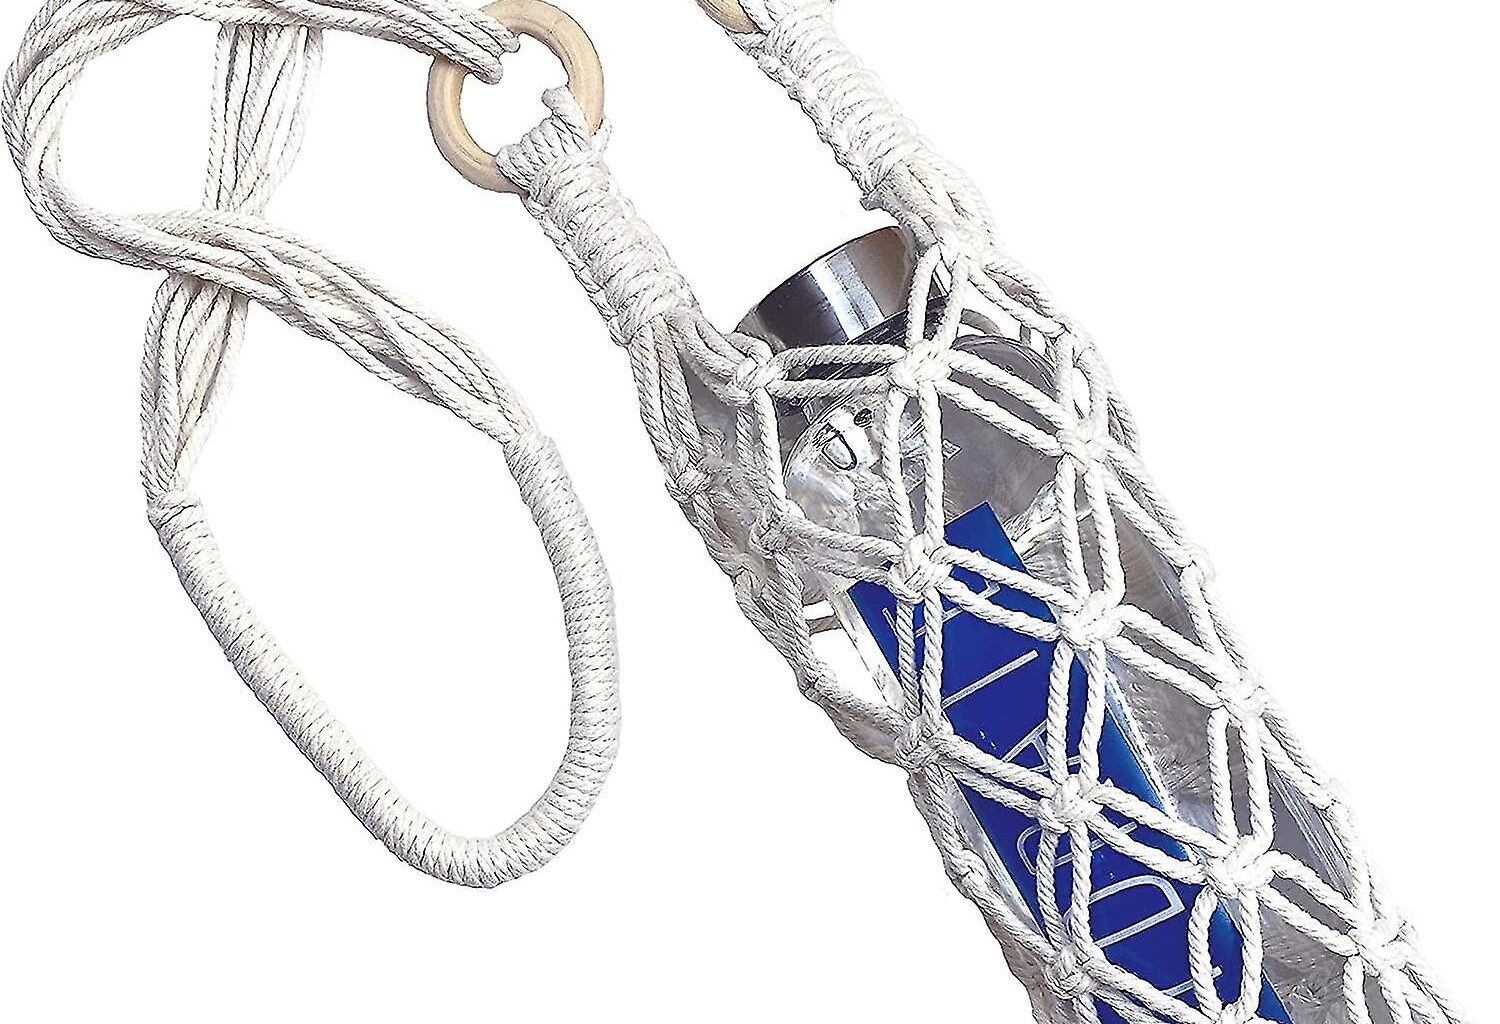
Step 3: Forming the Net for the Bottle
Now that you’ve mastered the basics of macrame knots, it’s time to weave some magic! This step will teach you how to form the net that will cradle your water bottle, combining beauty and practicality in a truly boho-chic way.
Creating the Net
Start with a square knot. Remember that lovely square knot you perfected in step 2? Here’s where it comes into play. Begin by crafting a square knot with the first four cords. This will be the start of your net.
Feeling adventurous? Try alternating square and spiral knots for a touchy-feely texture that adds an extra oomph to your water bottle holder.
Remember: Macrame is more than just knotting cords. It’s an art form – a dance of threads. So, don’t be afraid to experiment and add your own twist!
Forming the Mesh
Once you’ve created your first knot, it’s time to start building the actual mesh. This is done through a process called alternate square knotting. Here’s how:
- Pick up the next four cords and tie another square knot.
- Now, take the two rightmost cords from your first knot and the two leftmost cords from your second knot, and tie a square knot with them.
- Repeat this process, alternating between the sets of cords, until you have the desired length of the net for your bottle.
Pro tip: Keep the knots loose enough to slide on the cords but tight enough to hold the bottle securely. Finding this balance may take a little practice, but that’s part of the fun!
Finishing Up
Once you’ve created a net long enough to hold your bottle, finish off with a gathering knot. This will ensure your bottle stays put, and gives a neat finish to your macrame masterpiece.
And voila, your macrame water bottle holder is taking shape! So, how does it feel to be a macrame artist?
Step 4: Adding the Beads and Decorations
Well, we’re now at Step 4: Adding the Beads and Decorations. It’s time to let your creative juices flow and add a personalized touch to your macrame water bottle holder. From lustrous beads to vibrant decorations, there’s a myriad of adornments to choose from.
Choosing Your Beads and Decorations
Before we dive into the bead-adding process, let’s talk about what type of beads or decorations you might want to use. This decision is entirely up to you and your creative vision. Do you fancy a boho-chic vibe with wooden beads or perhaps a pop of color with some brightly painted ceramic beads? And remember, don’t limit yourself to just beads – you can also incorporate small charms, feathers, or even tassels into your design.
Stringing Your Beads
Once you’ve chosen your beads and decorations, it’s time to string them onto your cords. Here’s how:
- Thread your bead onto the cord.
- Slide the bead down to the desired position on your macrame.
- Tie a knot beneath the bead to keep it in place.
Keep in mind that the number of beads you add is entirely up to you. Maybe you want a single bead as a minimalist accent, or perhaps a line of beads for a more dramatic effect. The choice is yours!
Adding Other Decorations
Beads aren’t the only way to jazz up your macrame water bottle holder. Consider adding some other embellishments:
- Charms can be attached in the same way as beads, adding a fun and personal touch to your design.
- Feathers can be tied into the cords, adding an extra level of texture and visual interest.
- Tassels can be attached at the end of your cords, giving your water bottle holder a bohemian vibe.
However you decide to decorate your macrame, remember that the most important thing is to have fun with it. This is your chance to truly make your water bottle holder uniquely yours!
Note: Be sure to secure all beads and decorations firmly, so they don’t get lost during use. Safety first!
Step 5: Finishing Touches: Securing the Knots
Well, pat yourself on the back! You’ve made it to the final step of our macrame water bottle holder tutorial. Now, let’s tie up loose ends―literally! The last point of business? Securing the knots. This step is vital for ensuring durability and reliability of your newly crafted piece. After all, you wouldn’t want your water bottle to hit the deck mid-sip, would you? Now, let’s dive into the nitty-gritty details.
Loose Ends? Not on Our Watch!
First things first, we need to make sure those knots aren’t going anywhere. Look over your project. See any knots that appear loose or unstable? If so, tighten them up. Don’t hold back but remember, we’re working on a water bottle holder, not a stress ball.
- Tip 1: Use a pair of pliers if the knot is too tight to adjust by hand. Just be sure not to damage the cord.
- Tip 2: If a knot seems stubbornly loose despite your best efforts, consider adding a dab of clear fabric glue for extra security.
Snip, Snip: Trimming Excess
Now that all knots are securely in place, it’s time to trim any excess cord. Carefully cut close to your knot, but be mindful not to snip the knot itself. Remember, a good craftsman never blames their tools, so sharp scissors are your best friend here.
Seal the Deal: Knot Finishing
Last but not least, we’re going to give those knots a polished finish. This not only makes your water bottle holder look more professional but also prevents fray over time. How, you ask?
- Using a lighter, carefully singe the end of your cord. Make sure to do this in a well-ventilated area and away from any flammable materials.
- Quickly, while the cord is still warm, press the end of the cord against a hard surface. This seals the end of the cord, preventing any frays from occurring.
And voila, just like that, your macrame water bottle holder is ready to strut its stuff! Whether you’re hiking a mountain or just strolling in the park, your hydration station will now always be within arm’s reach. Now wasn’t that knot-urally fun?
Customization Ideas: Making Your Water Bottle Holder Unique
Let’s get crafty, shall we? It’s time to put your personal touch on your new macrame water bottle holder. Customization not only adds a dash of your personality but also gives your creation a unique edge that sets it apart in a sea of “me-too” holders. So, let’s dive in and explore some creative ideas to make your water bottle holder uniquely yours.
Color Me Beautiful
Instead of sticking with the traditional white or natural-colored macrame cord, why not experiment with a splash of color? You could opt for a single color, or go for an ombre effect with a mix of colors. Choosing vibrant or earthy tones can make your water bottle holder reflect your personal style. Don’t forget, the shades you select can also complement the color of your water bottle for an elegant touch.
It’s All in the Detail
Ever heard of the phrase, “The devil is in the detail?” Well, it couldn’t be more accurate when it comes to customized macrame. Adding a few extra knots here and there, or introducing a new pattern into the mix can transform your holder from ordinary to extraordinary. Be it spiral knots, square knots, or even hitch knots, every little detail counts.
Bling It Up
Who said macrame can’t have some sparkle? Adding beads or small charms is a fun way to jazz up your water bottle holder. You could thread in a few beads in between the knots or attach a charm to the end of the holder. Both add a playful and stylish aspect to your work. Just ensure the elements you add are robust and won’t easily break or fall off.
Size Does Matter
Remember, one size doesn’t always fit all. Your water bottle holder should accommodate the size and shape of your water bottle. So, consider this during your customization process. You could make it wider or tighter depending on the size of your bottle.
In conclusion, creating a customized macrame water bottle holder is about letting your creativity run wild. It’s about making a statement, expressing your style, and above all, having fun. So go ahead, be bold, be creative, and create a water bottle holder that’s as unique as you are!
FAQs: Common Questions About Macrame Water Bottle Holders
Ever find yourself scratching your head over certain aspects of macrame water bottle holders? Don’t fret, you’re not alone! It’s quite common to have a sea of questions popping up while diving into the world of macrame. So, let’s dive into some of the most frequently asked questions about macrame water bottle holders.
What type of cord is used for a macrame water bottle holder?
Macrame cords are the stars of the show when it comes to making water bottle holders. These cords are typically made from cotton, jute, hemp, or synthetic materials. For beginners, cotton cords are often recommended because they are soft, flexible, and easy to knot. However, feel free to experiment with different materials and find one that fits your style and needs.
How long does it take to make a macrame water bottle holder?
The time it takes to make a macrame water bottle holder can vary greatly depending on your skill level, the complexity of the design, and the size of the water bottle. As a ballpark figure, expect to spend anywhere from 2 to 5 hours on your first macrame water bottle holder.
Do I need any special tools to make a macrame water bottle holder?
Macrame is a pretty low-tech craft, and you won’t need a toolbox full of gadgets to get started. Here’s a short list of essentials:
- Macrame Cord: This is the main material you’ll be using.
- Scissors: A good pair of sharp scissors is a must for cutting cords.
- Measuring Tape: You’ll need this to measure and cut cords to the right length.
- Clip or Tape: This helps to secure your cord while you’re working.
Can I wash my macrame water bottle holder?
Yes, you can! However, remember to check the washing instructions for the type of cord you used. Most cotton and synthetic cords can be hand washed gently with mild soap and water. Allow it to air dry completely before using it again.
What if I make a mistake while knotting?
No worries! That’s part of the learning process. The beauty of macrame is that you can easily undo the knots and try again. So, keep calm, and knot on!
Conclusion: Enjoy Your Handmade Water Bottle Holder!
All right, folks! You’ve done it! You’ve crafted your very own macrame water bottle holder. Isn’t it amazing to see a simple piece of cord transform into a functional, fashionable accessory? It’s more than just a holder; it’s a testament to your creativity and dedication. Don’t forget to give yourself a much-deserved pat on the back.
Let’s take a moment to reflect on what you’ve accomplished:
- Mastered a new skill: You’ve learnt the art of macrame. This ancient craft is now in your repertoire. How cool is that?
- Sustainability champion: By making your own reusable water bottle holder, you’re taking a step towards reducing plastic waste. Bravo!
- Unleashed creativity: You’ve not only followed instructions, but you’ve also put your own spin on it, making your water bottle holder uniquely you.
Now, what’s next? You might be wondering. Well, the world of macrame is vast and welcoming. There are endless knots to learn, countless patterns to try. Ever thought about making a macrame plant holder or a wall hanging next?
Remember, practice makes perfect. Keep knotting, keep learning, and most importantly, keep having fun!
And hey, don’t forget to show off your macrame masterpiece! Post a photo on your social media, share it with your friends, inspire others to start their own macrame journey. You never know who you might inspire.
So, until next time, keep those cords twisting and turning. Happy knotting!