You’ve found the perfect stickers for your water bottle, but how can you ensure they’ll stand up to daily use, washing, and the inevitable splash or spill? In this article, we’ll explore a simple, cost-effective method to waterproof your stickers, keeping them vibrant and intact for longer. This guide is designed for ‘normal people‘, meaning no special skills or expensive materials are required. Just follow our easy instructions, and you’ll be sipping in style in no time!
Firstly, let’s clarify why it’s important to waterproof your stickers. Does it really matter?
Well, if you want your stickers to maintain their color and stickiness despite daily wear and tear, then yes, it definitely matters!
Now that we’ve established the importance, let’s dive into how to do it. We’ve broken down the process into simple steps for your convenience. So, are you ready to waterproof your stickers? Let’s get started!
Why Waterproofing Stickers on a Water Bottle is Important for Normal People
Have you ever thought about the importance of waterproofing stickers on a water bottle? Let’s dive into why it’s essential, especially for normal people like you and me.
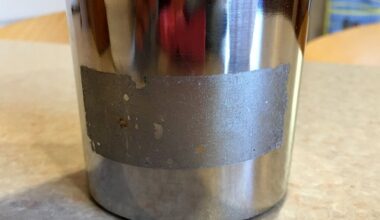
Firstly, it’s all about durability. Stickers that aren’t waterproof will quickly fade, peel, or wear off when they come into contact with water. For those of us who frequently refill our water bottles, this can mean our favorite stickers lose their charm in no time.
Note: Waterproofing your stickers helps to ensure they stay vibrant and intact, no matter how many times you refill or wash your bottle.
Secondly, think about functionality. Many people use stickers on their water bottles to identify them easily. If the stickers aren’t waterproof, they could fall off, leaving you with a generic water bottle that’s easy to mix up with others.
Lastly, it’s a matter of aesthetics. Stickers are a fantastic way to personalize your water bottle and express your personality or interests. Keeping them waterproof means they stay looking great, enhancing the overall look of your bottle.
- Durability – Waterproof stickers last longer.
- Functionality – Stickers help identify your bottle easily.
- Aesthetics – Waterproof stickers maintain their look, enhancing your bottle’s appeal.
In conclusion, normal people like us can tremendously benefit from waterproofing stickers on our water bottles. It’s an easy way to prolong the life of our stickers, keep our bottles identifiable, and maintain a personalized and attractive look.
Discover the Best Ways to Waterproof Stickers on Your Water Bottle
Have you ever put a cute sticker on your water bottle, only to see it deteriorate after a few washes? Don’t worry, we have a solution for you. Waterproofing your stickers is easier than you might think, and we’re here to guide you through a few simple steps.
1. Use Waterproof Stickers
First and foremost, always opt for waterproof stickers. They are designed to resist moisture and withstand weather conditions, making them an excellent choice for water bottles. While they may be a little pricier, they save you the hassle of constantly replacing damaged stickers.
2. Use a Protective Coating
Another way to waterproof stickers is by applying a clear, protective sealant. You can purchase a spray or brush-on sealant from any art or craft store. Follow the instructions on the package to ensure the best results.
Remember, always apply the sealant in a well-ventilated area to prevent inhaling fumes.
3. Laminate Your Stickers
It’s a little more work, but laminating your stickers ensures they’re completely waterproof. You’ll need a laminating machine or you can use self-sealing laminating sheets.
- Step 1: Place your sticker on the adhesive side of a laminating sheet.
- Step 2: Place another laminating sheet on top, adhesive side down.
- Step 3: Run the sandwiched sticker through your laminating machine, or if you’re using self-sealing sheets, press them together and smooth out any air bubbles.
4. Use Clear Packing Tape
If you’re on a budget, clear packing tape can work as a makeshift laminate. This method is straightforward and quick, but it might not look as professional as the other options.
- Step 1: Cut a piece of tape that is slightly larger than your sticker.
- Step 2: Stick the tape onto your sticker, ensuring it covers the entire surface.
- Step 3: Trim any excess tape around the edges.
With these methods, you can ensure your stickers remain vibrant and intact, even after countless washes. So go ahead, personalize your water bottle without any worries!
Step-by-Step Guide: How to Waterproof Stickers on Your Water Bottle
Your Materials
First, you’ll need the following materials:
- Clear packing tape or laminate sheets
- Scissors
- Your chosen stickers
- Your water bottle
With your materials ready, it’s time to get started.
Step 2: Prepare the Stickers
Start by laying out your sticker on a flat surface. If you’re using packing tape, cut a strip that is larger than your sticker on all sides. If you’re using laminate sheets, cut a piece that is just a bit larger than your sticker.
Step 3 Apply: the Waterproofing Material
Apply the packing tape or laminate sheet over the sticker, ensuring it covers the entire sticker. This creates a waterproof barrier for your sticker. For the best results, smooth out any air bubbles under the tape or laminate.
Step 4: Trim Excess Material
Next, use your scissors to trim any excess tape or laminate around the sticker, leaving a small border to ensure the waterproof seal.
Step 5: Apply the Sticker to Your Water Bottle
Finally, apply the sticker to your water bottle. Make sure the bottle is clean and dry before applying the sticker. Once the sticker is positioned correctly, smooth it onto the bottle, starting from the center and working your way out to avoid air bubbles.
And there you have it! Your sticker is now waterproof and ready for any adventure you throw at it. So, why not give it a try and start personalizing your water bottle today?
The Best Waterproof Materials You Can Use for Your Stickers
ing your stickers, you’ll want to use the best materials to ensure their long-lasting quality and durability. These materials will provide the protection your stickers need against water, weather, and wear and tear. But what are these materials?
Vinyl
Vinyl is a popular choice. This material is known for its durability and resistance to water. It’s thick, sturdy, and can handle a good deal of rough handling. This makes it an excellent choice for water bottles that are often tossed into bags or used outdoors.
Laminated Polypropylene
Another great option is Laminated Polypropylene. This material is similar to vinyl in its strength and water-resistance, but it also has a laminated layer that provides an additional level of protection. This is particularly useful for stickers with intricate designs or details that you want to preserve.
Clear Cast Vinyl
The third option is Clear Cast Vinyl. It’s a great material for anyone looking for a transparent sticker. This material is tough, water-resistant, and gives stickers a clear, professional appearance.
So, which one is the right one for you? It depends on your specific needs and preferences. Each of these materials has its own advantages, so consider what features matter most to you when deciding. Do you value durability? Transparency? Extra protection? Make your choice based on that.
Top Tips for a Successful Waterproofing Process on Your Water Bottle Stickers
Waterproofing your water bottle stickers is an essential step to ensure their longevity. But how can you do it successfully? Here are some top tips to guide you through the process.
1. Choose Waterproof Stickers
The first step is to choose waterproof stickers. These are specifically designed to resist water damage, making them ideal for water bottles. They may cost a little more than regular stickers, but they’re worth the investment.
2. Use a Waterproof Sealant
If you already have stickers that aren’t waterproof, don’t worry. You can make them waterproof by applying a waterproof sealant. This can be a clear acrylic spray, resin, or decoupage glue. Just make sure it’s safe for contact with food and drink containers.
3. Apply Stickers Correctly
The way you apply the stickers can impact their durability. Ensure the surface of your water bottle is clean and dry before applying the sticker. Then, smooth it out to remove any bubbles or wrinkles. This helps the sticker adhere properly and increases its resistance to water.
4. Allow Ample Drying Time
Once you’ve applied the sticker and any sealant, give it ample time to dry. This could be a few hours or even overnight, depending on the type of sealant you’re using. Rushing this step could result in a sticker that’s not fully waterproof.
5. Regular Maintenance
Maintaining your stickers is just as important as applying them. Regularly check them for signs of wear and tear and reapply sealant if needed. This ensures they stay waterproof for longer.
Remember, waterproofing your water bottle stickers not only preserves their look, but also their functionality. So, follow these tips and keep your stickers looking fresh and vibrant, no matter how many refills they go through.
DIY Waterproofing vs. Professional Waterproofing: Which One is the Best for Your Stickers?
Are you torn between doing it yourself and hiring a professional to waterproof your stickers? Let’s explore both options so you can make an informed decision.
DIY Waterproofing
DIY is an attractive option if you’re crafty and enjoy a challenge. It can also be a more cost-effective route.
- Pros:
- It’s less expensive.
- You have total control over the process.
- It can be a fun and rewarding project.
- Cons:
- It takes time and patience.
- Results may vary based on your skill level.
- There’s a risk of messing up, especially if you’re a beginner.
- Pros:
- Guarantees a high-quality finish.
- Saves you time and effort.
- You can rely on professional expertise and experience.
- Cons:
- It’s more expensive.
- You have less control over the process.
- There could be a wait time, depending on the professional’s schedule.
Common Mistakes to Avoid When Waterproofing Your Water Bottle Stickers
Waterproofing stickers on your water bottle might seem like a simple task, but there are some common mistakes that can leave you with less than satisfying results. Here’s what you need to watch out for:
- Skipping the Cleaning Step: It’s essential to clean the surface of your water bottle before applying any sticker. Dirt and grime can prevent the adhesive from sticking properly, leading to a short-lived sticker life. Always use a mild detergent and warm water for cleaning.
- Not Drying the Bottle Properly: Just as important as cleaning is thoroughly drying your bottle. Any lingering moisture can affect the sticker’s adhesion and your waterproofing efforts. Dry your bottle completely before applying the sticker.
- Applying the Sticker Hastily: Be sure to take your time when applying the sticker. Smooth it out slowly to avoid air bubbles. These bubbles not only affect the look of the sticker but also its longevity.
- Ignoring the Edges: When waterproofing, the edges of the sticker are often ignored. This can lead to peeling. Always ensure the edges are properly sealed.
So, you ask, how can you avoid these mistakes? Here’s a simple table to help:
| Mistake | Prevention |
|---|---|
| Skipping the cleaning step | Clean your water bottle with a mild detergent and warm water. |
| Not drying the bottle properly | Ensure the bottle is completely dry before application. |
| Applying the sticker hastily | Take your time, smooth out the sticker slowly to avoid air bubbles. |
| Ignoring the edges | Ensure the edges of the sticker are properly sealed when waterproofing. |
By avoiding these common mistakes, you’ll be well on your way to successful waterproofing of your water bottle stickers. It’s all about the right preparation, patience in application, and careful waterproofing. Let’s make those stickers last!
Enhance the Durability of Your Water Bottle Stickers with These Waterproofing Techniques
You love your water bottle. It’s not just a hydrating companion, but a canvas for your creativity and personality, adorned with stickers that tell a story. But how do you prevent your favorite stickers from peeling off or fading away due to water exposure? Let’s look at some techniques to waterproof your water bottle stickers.
Use Waterproof Stickers
The easiest way to ensure your stickers remain intact, rain or shine, is to start with waterproof stickers. These are made with a special type of vinyl that repels water, making them ideal for water bottle application. They’re a little more expensive than regular stickers, but isn’t it worth it to keep your favorite designs safe?
Apply a Waterproof Sealant
If you already have a regular sticker that you want to protect from water damage, don’t worry. You can apply a waterproof sealant. The sealant, usually a clear acrylic spray, forms a protective layer over the sticker and prevents water from seeping in.
- Make sure the area is clean: Before applying the sealant, clean the surface of the sticker and the surrounding area. This prevents dirt or debris from getting trapped under the sealant.
- Apply the sealant: Hold the can around 12 inches away from the sticker and spray evenly. Remember to cover the entire sticker.
- Let it dry: Allow the sealant to dry completely before using your water bottle. This step is crucial for the sealant to properly form a protective layer.
Use Protective Covers
Another alternative is to use a clear protective cover or tape over your sticker. This provides a physical barrier against water. It’s important to apply the cover smoothly to avoid air bubbles which could let water in.
Note: While these techniques can significantly enhance the durability of your stickers, none of them can make your stickers 100% waterproof. Regular wear and tear, as well as prolonged exposure to water, can still cause damage over time. So, treat your sticker-adorned water bottle with care!
Best Waterproof Stickers to Use on Your Water Bottle
Choosing the right waterproof stickers for your water bottle can make all the difference. So, what should you be looking for? The best stickers are those that are not only waterproof, but also durable, fade-resistant and easy to apply.
Durable
Water bottles go through a lot. They’re tossed into bags, dropped, and exposed to sunlight. You want a sticker that can withstand all this without peeling or cracking. Look for stickers made from vinyl or PVC, as these are known for their durability.
Fade-Resistant
You also want a sticker that won’t fade over time, especially if you’re planning to place your water bottle in sunlight. This means looking for stickers that are UV-resistant. These stickers have been treated to withstand the sun’s rays without losing their color.
Easy to Apply
Finally, the sticker should be easy to apply. A good waterproof sticker will have a strong adhesive, but it shouldn’t be difficult to remove without leaving a residue. The best stickers will also be flexible, allowing you to apply them to curved surfaces without difficulty.
Now that you know what to look for, here are some top picks:
- StickerYou: Known for their high-quality, durable stickers that are both waterproof and UV-resistant.
- Stickermule: Offers a variety of waterproof and UV-resistant sticker options with a strong adhesive.
- Redbubble: Offers a wide selection of unique, artist-designed stickers that are made from durable vinyl.
Remember, it’s not just about looking cool. A good waterproof sticker can help protect your water bottle from scratches and other damage, while also making it easy to identify in a crowd. So why not give one of these options a try?
Upgrade Your Water Bottle with These Waterproof Stickers
Love showing off your personality through stickers on your water bottle? What if I told you that you can enhance that experience by making your stickers waterproof? Yes, it’s possible and it’s incredibly easy, too! Waterproofing your stickers not only saves them from getting ruined by water spills or condensation, but it also extends their lifespan. In this section, we’ll walk you through a simple, step-by-step process to make your water bottle stickers waterproof.
What You’ll Need
- Clear packing tape or laminate sheets – These will serve as your waterproofing material.
- Scissors – You’ll need these to cut your waterproofing material to the right size.
- Stickers – Any sticker you want to waterproof and attach to your water bottle.
Steps to Waterproof Your Stickers
- Prepare your materials: Gather all the items mentioned above. Make sure your water bottle is clean and dry before you start.
- Cut the laminate or tape: Cut a piece of clear packing tape or laminate sheet that is slightly larger than your sticker.
- Attach the laminate or tape: Carefully place your sticker on the sticky side of the tape or laminate. Make sure all edges are sealed.
- Cut again: Trim off the excess tape or laminate, leaving a small border around the sticker for added protection.
- Apply to your bottle: Now, carefully stick your waterproofed sticker onto your water bottle. Smooth out any bubbles or wrinkles.
And there you have it! You’ve successfully waterproofed your stickers and upgraded your water bottle. So why not give it a go? Show off your personal style and keep those stickers looking fresh, no matter how many refills your water bottle goes through.