Are you drowning in a sea of discarded water bottle caps? Ever wondered if there’s a creative way to repurpose these ubiquitous little items? Well, you’re in luck! We’ve curated a list of fantastic, fun and easy-to-follow water bottle caps craft ideas to turn your trash into a treasure trove of decorative wonders. These crafts are not only a great way to recycle, but they’re also a fun and engaging way to spend your time. So, get ready to roll up your sleeves and unleash your creativity!
We’ve got 10 fabulous craft ideas lined up for you. Each of them is unique, engaging, and guaranteed to transform your water bottle caps into something amazing. So, whether you’re a DIY enthusiast looking for your next project, a parent seeking fun and educational activities for your kids, or simply someone who loves to create, these ideas have got you covered.
Before we dive in, a quick note: It’s essential to ensure the bottle caps are thoroughly cleaned before starting any project. Soak them in warm soapy water, rinse, and let them dry completely before you begin. Now that we have that out of the way, let’s get started!
Crafting with Recycled Water Bottle Caps
Ever gazed at that heap of water bottle caps after a vigorous workout or a parched summer day and wondered, “Could these be good for something other than filling up my garbage can?” Well, the answer is a resounding yes! Bottle caps, far from being mere trash, are actually a treasure trove of crafting possibilities. Let’s dive in and explore some creative ways to give these caps a second life.
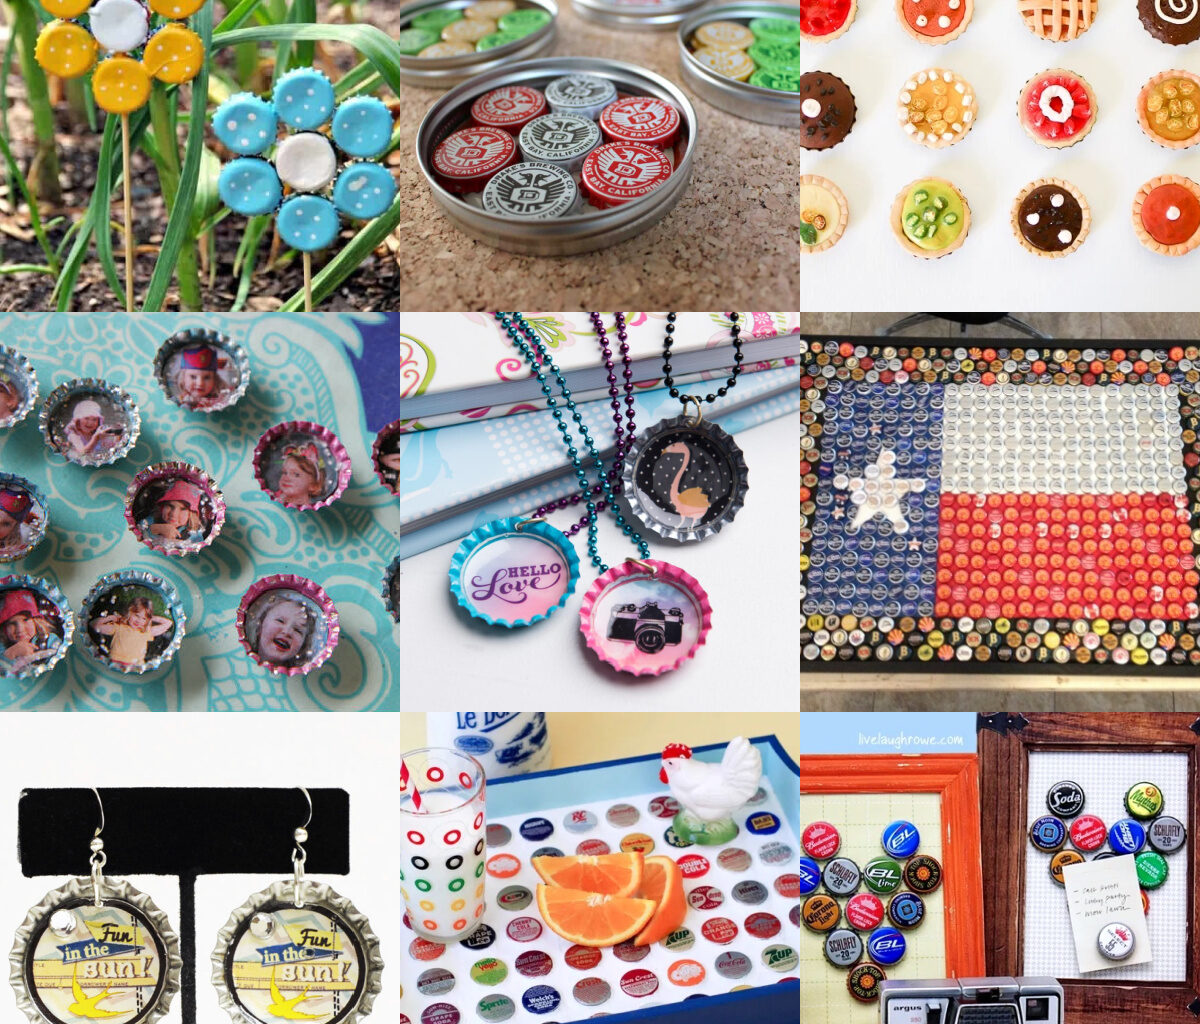
1. Bottle Cap Magnets
Why not start with something simple yet delightful? Bottle cap magnets can be a DIY project that adds a pop of color and personal touch to your fridge or magnetic board. All you need are the caps, some small photos or artwork, glue, and magnet strips. Pop your chosen image in the cap, attach the magnet, and voila, you have a funky new magnet!
2. Garden Decor
Give your garden a splash of whimsy by creating a bottle cap wind chime or a garden marker. You could even arrange bottle caps to make flowers or butterflies – it’s all up to your imagination. Not only will you be beautifying your garden, but you’ll also be doing your part to reduce waste.
3. Jewelry
Bottle cap earrings, necklaces, or bracelets, why not? With a bit of creativity, these recycled pieces can become stylish accessories. Use paint, stickers, or even fabric to decorate the caps, add some jump rings, and there you have it – wearable art!
4. Mosaics
With a variety of colors and sizes, bottle caps can be a wonderful material for creating mosaics. Whether you want to make a small coaster or a large wall piece, arranging these caps in different patterns can yield stunning results.
Remember, crafting with bottle caps isn’t just fun, it’s also a great way to reuse and recycle, contributing to a healthier planet.
5. Tabletops and Counter Edging
Give your old furniture a vibrant makeover by embedding bottle caps into the surface. This could be your coffee table, bar counter, or even a serving tray. Seal it with clear resin for a smooth finish. It’s a brilliant conversation starter!
6. Educational Tools
Who knew learning could be so fun? Use bottle caps to teach kids about colors, counting, or even the alphabet. Add stickers or write numbers and letters on each cap and turn learning into a playful game.
7. Festive Ornaments
From Halloween spiders to Christmas snowflakes, bottle caps can be transformed into adorable holiday decorations. They’re easy to make, and the kids will love joining in on the festive crafting fun.
8. Picture Frames
Give your photos a unique border by embellishing a frame with bottle caps. Whether you go for a rustic look or a colorful mosaic, it’s sure to make your memories even more special.
9. Creative Wall Art
Arrange your bottle caps into a design or pattern on a canvas for a unique piece of wall art. Whether it’s a simple heart shape or an intricate mandala, your creation will surely impress your guests.
10. Bottle Cap Candles
For a cozy and eco-friendly touch, fill your bottle caps with wax to create mini candles. Add a wick, let the wax solidify, and you have a charming addition for your next dinner party or a relaxing bath.
So the next time you finish a bottle of water, think twice before tossing the cap. It could be the start of your next creative masterpiece!
DIY Water Bottle Cap Magnets: A Simple and Fun Project
Who knew that those tiny bottle caps cluttering your kitchen drawers could be transformed into fun and functional magnets? Get ready to unleash your inner craftsperson as we dive into this charming DIY project!
First things first, let’s gather our materials. You’ll need:
- Water bottle caps: Round caps work best for this project.
- Magnets: Small, round magnets fit snugly inside the caps.
- Glue: Hot glue gun or super glue works well.
- Pictures or patterns: These will be placed inside the cap. Magazine cutouts, stickers, or printed pictures are popular choices.
- Clear resin or mod podge: To seal your design inside the cap.
Got everything? Great! Let’s begin the exciting process of transforming these humble caps into something special!
- Prepare your design: Cut your chosen picture or pattern into a circle that fits inside the cap. Apply a thin layer of glue to the cap, place the picture inside, and press down. Allow it to dry.
- Seal the design: Apply a layer of clear resin or mod podge over the picture to seal it. Let it dry completely.
- Attach the magnet: Apply a dollop of glue to the magnet and stick it to the back of the cap. Let it dry fully before using.
Voila! You’ve just created your very own water bottle cap magnet! Not only do they serve a practical purpose of pinning your important notes to the fridge, but they also add a pop of color and personality to your kitchen. Don’t you just love it when form meets function?
Remember, this is your creation, so feel free to play around with different designs and colors. The only limit is your imagination!
So, what are you waiting for? Start collecting those water bottle caps and let your creativity flow!
Make Your Own Water Bottle Cap Coasters with These Easy Steps
Ever found yourself looking at a growing collection of water bottle caps and wondering, “What on earth can I do with these?” Well, your answer is here – let’s transform those humble caps into quirky, unique coasters that will be the talk of your next gathering. Not only will you be creating something fun and practical, but you’ll also be taking a small step towards reducing waste. So, are you ready to unlock your inner artist? Let’s get started!
Materials You Will Need
- Water bottle caps: Gather as many as you can. The more the merrier, and the bigger your coaster!
- Glue gun: This will hold your masterpiece together. Make sure it’s loaded and ready to go.
- Plywood or cork board: This will serve as the base for your coaster. Ensure it’s big enough to house your design.
- Acrylic paint: Optional, but a great way to add a pop of color to your coasters.
Step-by-Step Guide to Creating Your Water Bottle Cap Coasters
- Gather Your Caps: Start collecting those caps. The more you have, the bigger and better your coaster will be. Don’t worry too much about color or size – diversity makes the finished product more interesting.
- Plan Your Design: Before you start gluing, lay out your caps on the plywood or cork board. Play around with the layout until you find a design you love.
- Stick ‘Em Down: Once you’re happy with your design, it’s time to get gluing. Carefully glue each cap down one at a time. Remember, patience is key here!
- Paint (if you want to): If you’ve chosen to paint your caps, now is the time. Let your creativity run wild! Just be sure to let the paint dry completely before moving on.
- Seal the Deal: For a professional touch, consider coating your coaster with a clear sealant. This will help protect your creation from any accidental spills.
And voila! You have created your very own water bottle cap coaster. It’s a conversation starter, a practical household item, and most importantly, it’s a testament to your creativity and resourcefulness. So the next time you have a water bottle cap in your hand, think twice before throwing it away. It could be the next addition to your coaster collection!
Unique DIY Water Bottle Cap Jewelry Ideas You Must Try
Who would have thought that those tiny caps from your water bottles could be transformed into dazzling pieces of jewelry? Well, consider it a delightful reality and let’s dive into some creative ideas that you can try at home. These DIY projects are not only fun and engaging but also give you the chance to craft unique accessories that are sure to earn you some compliments.
1. Trendy Bottle Cap Earrings
Remember those retro bottle cap earrings that took the fashion world by storm? Now you can make them yourself! Just grab a pair of unused bottle caps, some earring hooks, and a bit of glue. Voila! Your own stylish earrings are ready.
2. Magnificent Bottle Cap Necklace
Why spend big when you can DIY a chic necklace? You will need a bunch of bottle caps, a chain, jump rings, and a bit of creativity. String the caps onto the chain alternating with the jump rings, and there you have it: a gorgeous necklace!
3. Water Bottle Cap Bracelet
If necklaces are not your thing, how about a charming bracelet made from water bottle caps? Get some elastic cord, string the bottle caps together, and you have got a cute, playful bracelet.
4. Bottle Cap Pins and Brooches
Another lovely idea is to create pins or brooches using these caps. Attach a pin back to a decorated cap, and you have a trendy accessory that can jazz up any outfit.
5. Bottle Cap Charm for Keychains
Why not add a little sparkle to your keys? With some creativity, you can turn a simple cap into a delightful keychain charm. Just attach it to a key ring, and you are good to go.
Note: Always remember to take safety precautions while crafting. Use gloves, avoid sharp tools, and keep your DIY space tidy.
Ready to start your DIY adventure? With these ideas, you’ll never look at a water bottle cap the same way again. So, why wait? Start saving those bottle caps, unleash your creativity, and create some truly unique pieces of jewelry.
Create Your Own Water Bottle Cap Keychains for Extra Style
Who says keychains have to be boring and mundane? Not us! Dare to be different and spruce up your everyday essentials with water bottle cap keychains. These personalized trinkets are not only fun to make, but they also add a touch of your unique style to your set of keys. The best part? It’s super easy to do, and it’s a great way to recycle those seemingly useless water bottle caps.
So, how do you make your very own water bottle cap keychain? Just follow these simple steps:
- Collect your bottle caps: Start by gathering a bunch of water bottle caps. Remember, the more, the merrier. You never know when creativity might strike!
- Drill a hole: Using a small drill bit, carefully make a hole near the edge of the cap. It should be big enough to fit a keychain ring through.
- Personalize: Now, it’s time for the fun part – personalizing your cap. You could paint it, add stickers, or even glue on some sparkly gems to really make it stand out. Let your creativity run wild!
- Seal it: Once you’re happy with your design, seal your work with a clear varnish. This will make sure your masterpiece stands up to daily wear and tear.
- Attach the keychain: Slide your keychain ring through the hole you drilled earlier. And voila! You now have a stylish new keychain.
Note: Always remember to be careful when using tools like drills. Safety first!
So, why not take a leap of creativity and start crafting your own water bottle cap keychains? Not only will you add some flair to your keys, but you’ll also be doing your part to recycle and save the environment. Now that’s what we call a win-win!
DIY Water Bottle Cap Mosaic: A Colorful and Creative Idea
So, you have been wondering what to do with that growing collection of water bottle caps, huh? Wonder no more! Enter the world of DIY Water Bottle Cap Mosaics, where your creativity can run wild and free. This craft idea not only helps you reduce waste, but it also provides an outlet for your artistic expression. And guess what? You can create a myriad of beautiful designs using just your collection of bottle caps! Intrigued? Let’s dive in!
What You’ll Need:
- Bottle caps: You’ve got them, so it’s time to use them! Different colors will give you more options for your mosaic.
- A base: A piece of old wood, an unused picture frame, or even a plain wall. Any flat surface will do.
- Glue: A strong adhesive to secure your caps in place.
Step-by-Step Guide:
First things first, gather your materials and let’s get started!
- Design your layout: Before you start gluing, it’s a good idea to sort your caps by color and design your layout.
- Glue your caps: Once you’re happy with your design, start gluing your caps onto your base. Be patient and allow the glue to dry fully.
- Enjoy your masterpiece: Once your glue has dried and your caps are secure, step back and admire your work. You’ve just created your very own water bottle cap mosaic!
Whether you’re looking to brighten up your living space or you’re searching for a fun craft to do with the kids, this DIY Water Bottle Cap Mosaic is a colorful and creative solution. Not to mention, it’s a great way to put those water bottle caps to good use. So what are you waiting for? Gather your caps and let your creativity flow!
Remember, there’s no right or wrong way to create your mosaic. The beauty is in the uniqueness of your design. So let loose and have fun with it!
When it comes to crafting with water bottle caps, the possibilities are as endless as your imagination. So start collecting those caps and let your creativity shine with this DIY Water Bottle Cap Mosaic. Happy crafting!
Water Bottle Cap Curtain: A Unique and Inexpensive Way to Decorate
Ever thought about how you could turn those leftovers from your hydration into a dazzling piece of home decor? The answer lies in your hands. We’re talking about a curtain made from water bottle caps. Yes, you heard it right! This quirky and inventive project will not only help you recycle but also add a unique touch to your space. So, ready to get your hands busy?
Step-by-step Guide:
- Collect: Begin by collecting water bottle caps. How many you ask? Well, it depends on the size of your curtain. A decent-sized curtain could require hundreds of them, so start collecting!
- Clean: Once collected, rinse the caps thoroughly. This is to ensure no sticky residue is left behind. Your curtain should be clean, not sticky!
- Paint: Here’s where the fun begins! Paint your caps in various colors. Go wild or keep it minimal – the choice is yours. Remember, it’s your curtain, so make it reflect your personality.
- Drill: After the paint dries, use a small drill to make holes in the caps. Two on either side should do the trick.
- Thread: Get some strong thread or thin wire and start threading the caps together. You can arrange them in any pattern you like. Be creative!
- Hang: Attach your curtain to a rod or a wire and hang it up. There you have it, a stylish and unique curtain made from water bottle caps.
It might sound like a lot of work, but trust us, it is worth every second. This water bottle cap curtain doesn’t just serve a functional purpose, it is also a statement piece and a conversation starter. Not to mention, it’s a fantastic way to contribute to the environment. So, what are you waiting for? Get rolling with those bottle caps!
Remember, “One man’s trash is another man’s treasure.” In this case, it’s your own treasure!
And yes, if you have kids at home, this can be a fun and engaging project to get them involved in. They’ll love it, and you’ll appreciate the helping hands. Plus, it’s a great way to teach them about recycling and creativity!
Upcycling Water Bottle Caps: Creative Ideas for the Home
other purpose? Well, they can! Let’s dive into the world of upcycling and discover some creative ideas you can apply right at home:
1. Bottle Cap Mosaic Table
Who would’ve thought those little caps could transform a bland tabletop into a vibrant piece of art? All you need is glue, a clear resin, and a whole bunch of bottle caps. Arrange them on your table, fix them with glue, and then pour the resin over to create a smooth, glossy surface. Voila! You have a colorful mosaic table that’s sure to be a conversation starter.
2. DIY Christmas Ornaments
Bring holiday cheer to your tree with DIY bottle cap ornaments! Paint the caps in festive colors, attach a ribbon or a piece of twine for hanging, and you got yourself some unique Christmas tree decorations.
3. Garden Decor
Why not add some pop to your garden? Stick the caps onto a piece of wood or a garden stake in fun patterns and let it sparkle under the sun.
4. Bottle Cap Coasters
If you’ve got a lot of bottle caps, why not turn them into coasters? Simply glue them onto a circular or square base, side by side, to create a unique coaster for your cold beverages. To make it look even more chic, you can spray paint it a solid color or add a touch of glitter.
5. Bottle Cap Picture Frames
Give your picture frames a funky makeover by sticking bottle caps all around the edges. It’s an easy way to add flair to your desk or wall display.
6. Bottle Cap Magnets
Attach magnets to the back of the bottle caps and stick them to your fridge or magnetic board. You can even customize them by sticking photos or tiny artworks inside.
7. Bottle Cap Candles
Did you know you can make tiny candles out of bottle caps? Fill the caps with wax, insert a small wick, and let it set. These mini candles can be used as decorative pieces or as emergency lighting solutions.
8. Bottle Cap Wind Chime
String together bottle caps and hang them from a branch or a piece of wood to create a unique and beautiful wind chime for your garden or patio.
9. Bottle Cap Bottle Holder
Sounds ironic, doesn’t it? But it’s true – you can make a bottle holder out of bottle caps. Simply glue the caps together in a circular pattern and let it dry. This holder can then be used to store bottles or cans.
10. Bottle Cap Jewelry
Yes, you read that right! Bottle caps can be used to create funky jewelry pieces. Earrings, pendants, bracelets – you name it! Use your creativity and turn these ordinary caps into extraordinary fashion accessories.
Remember, the key to successful upcycling lies in creativity and patience. These are just a few ideas to get you started. So, are you ready to give your water bottle caps a second life?
Water Bottle Cap Christmas Ornaments: A Fun and Festive Craft
Who said Christmas decorations have to be expensive or store-bought? There’s a world of creative possibilities right under your nose, and one of them is water bottle cap Christmas ornaments. This festive and fun craft idea is a perfect way to upcycle, create unique decorations, and engage in some holiday cheer. All you need are some empty water bottle caps, some basic craft supplies, and a dash of creativity.
Materials You’ll Need:
- Water bottle caps
- Acrylic paint
- Glitter (optional)
- Hot glue gun
- Ribbon or yarn
- Hole puncher
Armed with your materials? Excellent! Now, let’s dive into the crafting process. Remember, art is subjective so feel free to add your unique touch to these steps. After all, what’s more festive than a dash of individuality?
Step-by-Step Guide:
- Step 1: Start by painting your water bottle caps. You can paint them in traditional Christmas colors like red and green or go for a winter wonderland look with blues and whites. Don’t forget to let the paint dry completely before moving on to the next step.
- Step 2: If you’re feeling extra festive, this is the time to sprinkle some glitter on the wet paint. A little sparkle never hurt anybody, right?
- Step 3: Using your hot glue gun, stick the caps together to form shapes. You can make a Christmas tree by sticking them in a pyramid shape or a snowflake by arranging them in a radial pattern.
- Step 4: Punch a hole at the top of your ornament and thread a ribbon or piece of yarn through it. This will allow you to hang your new handmade ornament on the tree.
Pro Crafting Tip: Keep a cup of water and a rag nearby while painting. This way, you can quickly clean your brushes and avoid unwanted color mixing.
And voila! You’ve created your very own water bottle cap Christmas ornaments. Not only is this a great craft to do on a chilly winter afternoon, but it also offers a sustainable way to decorate for the holidays. Plus, these ornaments make for great, personalized gifts for your loved ones. So, why not give it a try? It’s time to uncork your creativity and make your holiday season even more special.
Simple DIY Water Bottle Cap Stamps for All Ages
Did you ever imagine you could turn those tiny water bottle caps into something as fascinating as DIY stamps? Well, now you can! Water bottle cap stamps are not only super fun to make, but they also add a personal touch to your crafts. So, hold onto those caps and let’s get crafting!
Materials You’ll Need
- Bottle Caps: Gather as many as you can. The more, the merrier!
- Foam Sheets: These will act as your stamp surface. Colorful sheets can add an extra pop to your stamp collection.
- Scissors: For cutting your foam sheets into the desired stamp shapes.
- Glue: To stick your foam shapes onto the bottle caps securely.
- Ink Pads: Choose any colors you like. It’s time to get colorful!
Step-by-Step Guide to Creating Your Stamps
- Shape Your Stamps: Start by cutting out shapes from your foam sheets. These can be anything you like – stars, hearts, animals, the options are endless!
- Stick ‘Em Up: Now, take your glue and stick the foam shapes onto the top of your bottle caps. Give them some time to dry so they’re ready for the next step.
- Time to Stamp: Once dry, dip the foam surface into your ink pad and stamp away! You’ll be amazed at how cute and personal these stamps can make your crafts look.
Incorporating such a fun and simple craft into your routine can not only keep those pesky bottle caps out of the landfill but also spark a whole new level of creativity in you. So, why not give it a try?
Remember: Always let your glue dry completely before you start stamping, and never be afraid to get a little messy – that’s where all the fun is!
So, go ahead and dive into the world of DIY with these super cool water bottle cap stamps. We guarantee you’ll be stamping everything in sight before you know it!